
How Should My Hook Be Placed in the Jaws?
Setting your hook deeper into the jaws will provide more clamping force so jaws will clamp tighter and hold hooks better. Placing the hook as far into the jaws as is reasonable will also result in longer jaw life. However, the more of the hook that you have in the jaws, the less there is exposed for you to tie on. Also, if you have a hook with an offset point, placing the hook with the point inside the jaws could damage the tip. Setting the hook very near the tips of the jaws will concentrate all the clamping force in a very small area near the edge of the jaw and could result in premature wear of your jaws. We recommend having the midpoint of the hook bend exit the jaws at the highest point of the jaws off the surface of your table. If there is room to tie the fly, setting the hook even deeper will provide a more reliable grip. See the photos below for clarification.
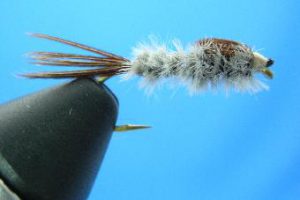 This photo shows the hook deep in the jaws.
Notice how there is little room to mount a tail
or other materials at the back of the fly.
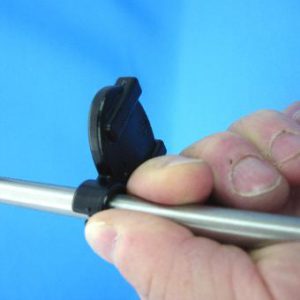
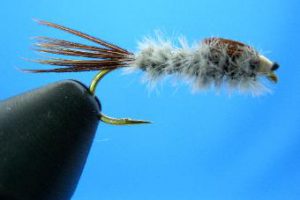 This photo shows the hook very near the tips
of the jaws. This hook may move when tying
due to insufficient clamping force. Also, all of
the clamping force is concentrated at the tips
of the jaws and may result in premature wear.
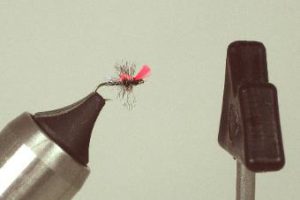
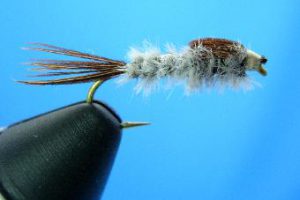 This photo shows the hook well placed. It is
deep enough in the jaw to be held securely, but
there is plenty of space at the back of the hook
to work on the fly. Setting the hook slightly deeper
would allow the jaws to clamp slightly tighter.
Can My Bobbin Cradle Pivot be Snapped on and off the Vise Shaft?
We recommend you DO NOT snap the Bobbin Cradle Pivot on and off the Vise Shaft. It should actually be slid on or off the end of the Shaft. To assemble the Bobbin Cradle Pivot, place the Pivot on a hard flat surface. Push the end of the Vise Shaft into the opening of the Pivot formed by the two curved fingers. Hold the Pivot close the Vise Shaft and slide it into position. To remove the Pivot, hold it near the Vise Shaft and slide it off the end of the Shaft. We also recommend you leave the Bobbin Cradle Pivot on the vise even when the Bobbin Cradle is not in use and simply remove the Cradle from the Pivot.
 Place the Bobbin Pivot on a hard, flat surface.
 Press the end of the Vise Shaft into the opening
formed by the two ears on the Bobbin Pivot.
 Slide the Pivot into position
by pushing it along the Shaft.
Push at a point near the Vise Shaft.
To remove, slide the Pivot off
the end of the Shaft.
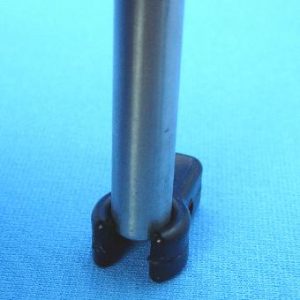
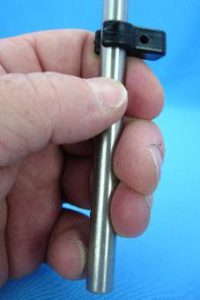
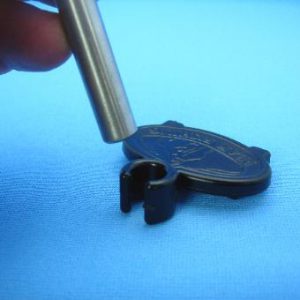
Can my Waste Catcher Mount be Snapped on and off the Vise Shaft?
We recommend you DO NOT snap the Waste Catcher Mount on and off the Vise Shaft. It should actually be slid on or off the end of the Shaft. To assemble the Waste Catcher Mount place the Mount on a hard, flat surface. Push the end of the Vise Shaft into the opening of the Mount formed by the two curved fingers. Hold the Pivot close the Vise Shaft and slide it into position. To remove the Mount, hold it near the Vise Shaft and slide it off the end of the Shaft. We also recommend you leave the Mount on the vise even when the Basket is not in use or is removed to empty the contents. Simply remove the Basket from the Mount.
 Place the Waste Catcher Mount on a hard, flat surface.
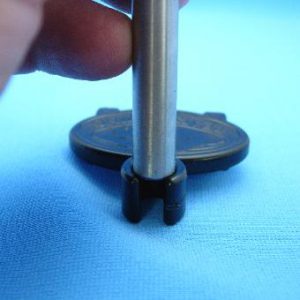 Press the end of the Vise Shaft into the opening formed
by the two ears on the Waste Catcher Mount.
 Slide the Waste Catcher Mount into position by pushing
it along the Shaft. Push at a point near the Vise Shaft.
To remove, slide the Mount off the end of the Shaft.
How Small a Fly Can I Tie on the Standard Jaws?
This really comes down to each individual tyer and how they tie. The standard jaws will clamp completely closed and can hold even the smallest hook wires. The answer is really how much room do you need around the back of the hook to tie your fly. The advantage of PEAK’s Midge Jaws is not that they will hold smaller hooks, but rather that the tips are sculpted (see photo below) to allow more room to work on small hooks.
 Midge Jaws with scalloped profile for increased
room when tying on small hooks.
How Do You Adjust the Jaws for Different Hook Sizes?
Just in front of the Cam Handle there is an Adjustment Nut to adjust the Jaws for various hook sizes. Turning the Nut to move it closer to the Jaw tips will adjust the Jaws for larger hooks. Turning the Nut to move it closer to the Cam Handle will adjust the Jaws for smaller hooks.
 Turn the Adjustment Nut to move the
Nut toward the Jaw Tube for larger hooks.
 Turn the Adjustment Nut to move the
Nut toward the Cam Handle for smaller hooks.