FAQs
Frequently Asked Questions
Do You Sell Direct?
No, we don’t sell PEAK Fishing fly tying vises or accessories direct. We rely on our dealer network to provide our product to the end user and help customers with questions about vises and other aspects of tying. You may feel free to contact us by phone 970-622-9601 or e-mail and we will be happy to answer any questions as well, but you will need to make your purchase from one of our dealers.
Where Can I Buy PEAK Fishing Products?
Visit our dealers page. Here you’ll find a list of all our dealers world wide and information to help you contact them.
Where Can I Buy Replacement Parts If I Need to Service My Vise?
Service, or replacement parts (not accessories) are available through www.peak-outdoors.com.
How Do I Assemble My PEAK Rotary Vise?
Click here to see a video of vise assembly instructions. Your PEAK Fishing vise is shipped with assembly and maintenance instructions, you may also call us at 970-622-9601, email us at service@peakfishing.com or see your local dealer for assistance.
How Should My Hook Be Placed in the Jaws?
Setting your hook deeper into the jaws will provide more clamping force so jaws will clamp tighter and hold hooks better. Placing the hook as far into the jaws as is reasonable will also result in longer jaw life. However, the more of the hook that you have in the jaws, the less there is exposed for you to tie on. Also, if you have a hook with an offset point, placing the hook with the point inside the jaws could damage the tip. Setting the hook very near the tips of the jaws will concentrate all the clamping force in a very small area near the edge of the jaw and could result in premature wear of your jaws. We recommend having the midpoint of the hook bend exit the jaws at the highest point of the jaws off the surface of your table. If there is room to tie the fly, setting the hook even deeper will provide a more reliable grip. See the photos below for clarification.
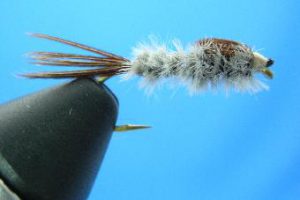 This photo shows the hook deep in the jaws.
Notice how there is little room to mount a tail
or other materials at the back of the fly.
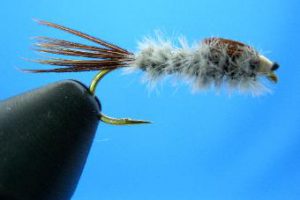 This photo shows the hook very near the tips
of the jaws. This hook may move when tying
due to insufficient clamping force. Also, all of
the clamping force is concentrated at the tips
of the jaws and may result in premature wear.
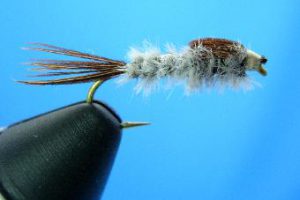 This photo shows the hook well placed. It is
deep enough in the jaw to be held securely, but
there is plenty of space at the back of the hook
to work on the fly. Setting the hook slightly deeper
would allow the jaws to clamp slightly tighter.
Can My Bobbin Cradle Pivot be Snapped on and off the Vise Shaft?
We recommend you DO NOT snap the Bobbin Cradle Pivot on and off the Vise Shaft. It should actually be slid on or off the end of the Shaft. To assemble the Bobbin Cradle Pivot, place the Pivot on a hard flat surface. Push the end of the Vise Shaft into the opening of the Pivot formed by the two curved fingers. Hold the Pivot close the Vise Shaft and slide it into position. To remove the Pivot, hold it near the Vise Shaft and slide it off the end of the Shaft. We also recommend you leave the Bobbin Cradle Pivot on the vise even when the Bobbin Cradle is not in use and simply remove the Cradle from the Pivot.
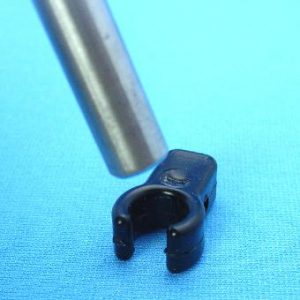 Place the Bobbin Pivot on a hard, flat surface.
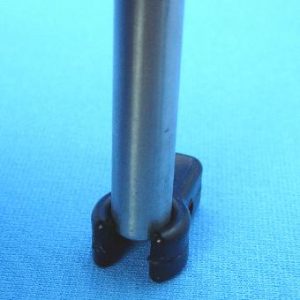 Press the end of the Vise Shaft into the opening
formed by the two ears on the Bobbin Pivot.
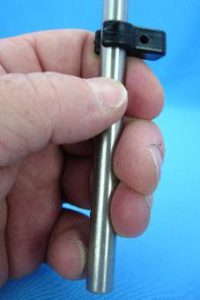 Slide the Pivot into position
by pushing it along the Shaft.
Push at a point near the Vise Shaft.
To remove, slide the Pivot off
the end of the Shaft.
Can my Waste Catcher Mount be Snapped on and off the Vise Shaft?
We recommend you DO NOT snap the Waste Catcher Mount on and off the Vise Shaft. It should actually be slid on or off the end of the Shaft. To assemble the Waste Catcher Mount place the Mount on a hard, flat surface. Push the end of the Vise Shaft into the opening of the Mount formed by the two curved fingers. Hold the Pivot close the Vise Shaft and slide it into position. To remove the Mount, hold it near the Vise Shaft and slide it off the end of the Shaft. We also recommend you leave the Mount on the vise even when the Basket is not in use or is removed to empty the contents. Simply remove the Basket from the Mount.
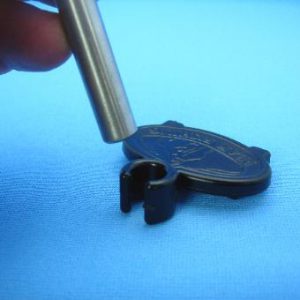 Place the Waste Catcher Mount on a hard, flat surface.
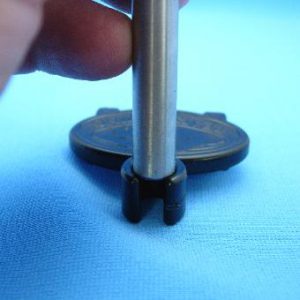 Press the end of the Vise Shaft into the opening formed
by the two ears on the Waste Catcher Mount.
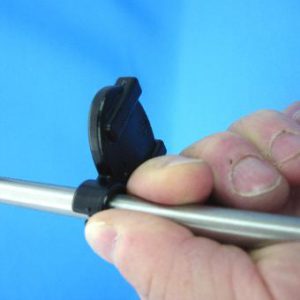 Slide the Waste Catcher Mount into position by pushing
it along the Shaft. Push at a point near the Vise Shaft.
To remove, slide the Mount off the end of the Shaft.
How Small a Fly Can I Tie on the Standard Jaws?
This really comes down to each individual tyer and how they tie. The standard jaws will clamp completely closed and can hold even the smallest hook wires. The answer is really how much room do you need around the back of the hook to tie your fly. The advantage of PEAK’s Midge Jaws is not that they will hold smaller hooks, but rather that the tips are sculpted (see photo below) to allow more room to work on small hooks.
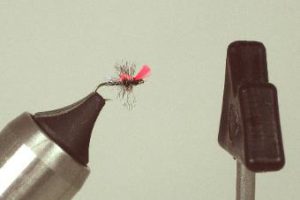 Midge Jaws with scalloped profile for increased
room when tying on small hooks.
How Large a Fly Can I Tie on the Standard Jaws?
What really determines this is the wire diameter used to make the hook. You’ll be able to tie larger flies on fine wire hooks than extra heavy wire hooks. Your standard jaws should hold hooks of wire diameter up to about .044 inches.
How Large a Fly Can I Tie on the Midge Jaws?
The Midge Jaws are intended for smaller dry fly hooks. If you need to tie a few larger flies, put a hook in the vise and see if it holds the hook tightly enough. Because of the reduced clamping area (due the scalloped shape of the jaws) you won’t get as much holding force, so you won’t be able to tie on hooks as large as the standard jaws will allow you to tie on. We do not recommend you tie large numbers of flies using hooks larger than a 16 dry fly because the clamping force required to hold larger hooks is concentrated in a small area when using our Midge Jaws and over time this can lead to wear or damage to the jaws.
What Size Hooks Will PEAK's Saltwater Jaws Accept?
PEAK’s Saltwater Jaws will accept hooks made from wire of about .040” diameter to about .075″ diameter. These are conservative estimates, you may find you are able to use slightly smaller, or larger hooks.
How Do You Adjust the Jaws for Different Hook Sizes?
Just in front of the Cam Handle there is an Adjustment Nut to adjust the Jaws for various hook sizes. Turning the Nut to move it closer to the Jaw tips will adjust the Jaws for larger hooks. Turning the Nut to move it closer to the Cam Handle will adjust the Jaws for smaller hooks.
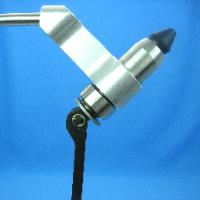 Turn the Adjustment Nut to move the
Nut toward the Jaw Tube for larger hooks.
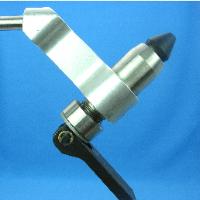 Turn the Adjustment Nut to move the
Nut toward the Cam Handle for smaller hooks.
Are PEAK's Jaws Interchangeable?
Both the PEAK Rotary Vise and the PEAK non-Rotary Vise have optional Midge and Saltwater Jaws available for them. These optional Jaws are interchangeable with the Standard Jaws supplied with your Vise and require no modifications to your Vise. However, Jaws intended for the PEAK Rotary Vise are not interchangeable with Jaws intended for the non-Rotary Vise. Likewise, Jaws intended for the non-Rotary Vise cannot be used with the Rotary Vise.
How Tightly Do the Jaws Need to Be Adjusted to Clamp My Hook?
Your Jaws should be adjusted for the minimum clamping force required to solidly hold your hook. The first consideration when adjusting the clamping force of the jaws is to make sure they hold tightly enough that your hook will not move while you are tying. A secondary consideration is to adjust the Jaws so that they are not any tighter than is required. By avoiding excessive clamping force, you will extend the life of your jaws and it will also be easier to lock and unlock the clamping cam lever. This also reduces the chances that a part will be damaged or broken.
What Maintenance Is Required for My Vise?
Very little maintenance is required for your PEAK Fishing Vise, maintenance tips and service information are also included with your PEAK Fishing Vise.
- The stainless-steel components of your vise need no maintenance under normal circumstances.
- You may see tarnish build up over time on the brass components. This will not damage your Vise but if desired it can be removed with any method appropriate for removing tarnish from brass or silver such as tarnish remover or silver/brass polish applied with a soft rag.
- The Jaws, and Cam Handle of your PEAK Fishing Vise are hardened tool steel with a black oxide finish. This is enough protection to prevent rust in most instances. If you are in a high humidity area, or especially a coastal area where there may be a combination of high humidity and salt suspended in the air you may need to take extra precautions. A light oil such as WD-40 can be sprayed on a rag and wiped on the Jaws and Cam Handle for extra protection, especially if you will be storing the Vise for an extended period of time. It may be necessary to disassemble the Cam Handle and remove the Jaws to apply oil to portions of the Jaw inside the Jaw Tube.
- An oil like WD-40 will not harm any of the stainless steel or brass components. If you live in an area where your vise could be exposed to salt suspended in the air, such as a coastal region, a light coating of oil when your Vise is being stored will help protect the stainless steel and brass from corrosive salt.
- If your Jaws become sticky they may need to be lubricated. Disassemble the Cam Handle and remove the Jaws. Clean the Jaws, WD-40 is a good option for cleaning as it will also provide a thin protective oil coating over the black oxide finish after you re-assemble the Vise. Clean the inside of the Jaw Tube. Apply a very light coating of light duty grease to the tapered portion of the inside of the Jaw Tube, replace the Jaws and re-assemble the Cam Handle.
- If your rotary movement becomes stiff you may need to lubricate the Rotary Shaft. First verify the rotary adjustment resistance screw is backed out so the tip is not contacting the Rotary Shaft (the Rotary Shaft will spin freely when this screw is not engaged). If the rotation is still not free, remove the Rotary Handle from the end of the Rotary Shaft (there is a set screw in the Handle that holds it to the Shaft, loosen the set screw and slide the Handle off the Shaft). The Rotary Shaft will now slide out of the Brass Head of the Vise. The set screw may raise a slight burr on the shaft which can prevent the shaft from sliding out. If this is the case, carefully remove the burr with a piece of Emory or a very fine needle file. Clean the Shaft and the inside bore of the Brass Head, WD-40 works well. Apply a very light coating of light duty grease to the portion of the Shaft that will be inside the Brass Head and reassemble the Vise. Wipe down any extra grease after assembly is complete.
How Do I Adjust the Rotary Motion resistance of the Vise?
You should have a brass or plastic screw in the underside of the Brass Head of your Vise. If the screw is a brass screw it should have a plastic tip. We recommend adjusting the resistance force just high enough so when you turn the Vise Head almost upside down the Head will not free fall when you let go of the Rotary Handle. Increase rotary resistance by tightening the adjustment thumbscrew. For less resistance, back the screw out slightly.
What Tools Are Needed to Remove or Change the Jaws?
If you’ve purchased optional Jaws from PEAK Fishing, the only tool required, a 3/32″ Hex Key, is included with the Jaws. This size is normally included with hex key sets typically available at many hardware stores. Some tool outlets also sell individual hex keys.
What Tools Are Needed to Remove the Rotary Handle?
The Rotary Handle Assembly of your PEAK Vise does not normally need to be removed. If you feel you need to perform maintenance, such as lubrication of the Rotary Shaft inside the Head of the Vise, the only tool required is a 5/64″ hex key. This size is normally included with hex key sets typically available at many hardware stores. Some tool outlets also sell individual hex keys. If you purchased one of PEAK Fishing’s interchangeable head assembly accessories, those accessory heads include the tool required to loosen the Rotary Handle Set Screw.
What Tools Are Needed to Assemble My Vise, Accessory Shaft, and/or Brass Riser?
Only one tool is required to assemble your Vise and either the Accessory Shaft or Brass Riser, a 1/8″ Hex Key. The same tool is also used whether you have a Pedestal Base or a C-Clamp. A 1/8″ Hex Key is included with your vise. If you purchase a Brass Riser you will find a 1/8″ Hex Key also included with that accessory. This size is normally included with hex key sets typically available at many hardware stores. Some tool outlets also sell individual hex keys.
What Tools Are Needed to Assemble or Remove My D-Arm?
The only tool required to assemble or remove your D-Arm is a 5/32″ Hex Key, and one is included with your D-Arm. This size is normally included with hex key sets typically available at many hardware stores. Some tool outlets also sell individual hex keys.
Will Other Manufacturers Accessories Fit a PEAK Vise?
Any other manufacturer’s accessory that will mount to a 3/8″ diameter riser shaft should work with your PEAK Vise. One accessory that does not mount to the 3/8″ riser shaft is a material clip. The PEAK Rotary Shaft is 1/4″ Diameter so a material clip that will mount to a 1/4″ rotary shaft will work with your PEAK Vise.
Which PEAK Accessories Will Work With My Non-PEAK Vise?
PEAK’s accessories (except our material clip) are designed to fit a 3/8″ diameter riser shaft so they will work with any vise that uses a 3/8″ riser C-Clamp both are valuable upgrades for adding stability and versatility to your current vise. Changing your pedestal base or C-Clamp to a PEAK Pedestal Base or C-Clamp will also allow you to add the PEAK Accessory Shaft. No other vise mount we know of allows for the use of an accessory shaft.
